
Removing and wiring your thermostat is a simple DIY job for any homeowner and an essential skill to possess. If you’re having problems with your thermostat and need to replace it or want to upgrade to a smart thermostat, knowing how to wire it is essential. There are many different types and brands of thermostats available depending on your HVAC system.
Let’s identify your type of thermostat, the different types of wires, and what each wire controls.
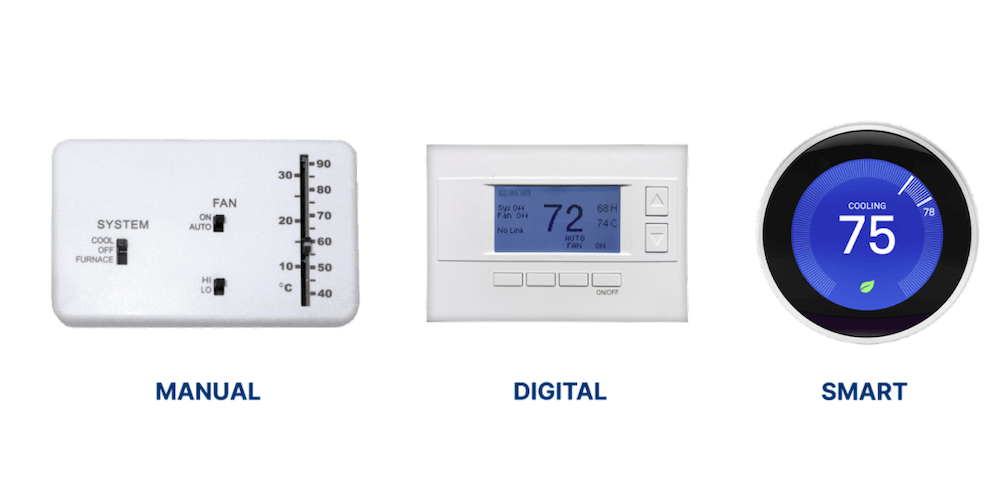
Types of thermostats
Low voltage (24v)

Image source: Grainger
The most common type of thermostat is low voltage (24-volt), which is used with furnaces, boilers, or heat pumps. Low voltage thermostats are more popular because they can reduce energy consumption, saving you money on your electricity bills in the long run.
Different types of low voltage thermostats
Typically, low voltage thermostats control both heating and air conditioning, affecting multiple rooms in your home. Some mechanical thermostats, most digital or programmable thermostats from brands like Honeywell, and smart thermostats such as the Nest are low voltage, typically featuring between 2 and 9 different colored wires.
Line voltage (120v/240v)

Image source: JBJ Supply
Line voltage (120v or 240v) thermostats are typically used with electric heaters like baseboards and wall vents that can be seen in older homes, condos, and city apartments. Typically, line voltage thermostats feature 2-4 thicker wires (single pole or double pole) which control the heat only. Four wire (double-pole) thermostats can be shut off whereas two-wire (single pole) thermostats can only turn to their lowest setting.
If you have a line voltage thermostat and want to upgrade to something modern like a smart thermostat, you may have to purchase an adapter or look for a Wi-Fi thermostat, which offers compatibility with most electric heat and baseboard heating systems.
Types of wiring
The most common types of 24v thermostats feature 2 to 5 wires, but there could be up to 9 wires. Here’s what each wire system represents depending on which type of thermostat configuration you have.
Two wires

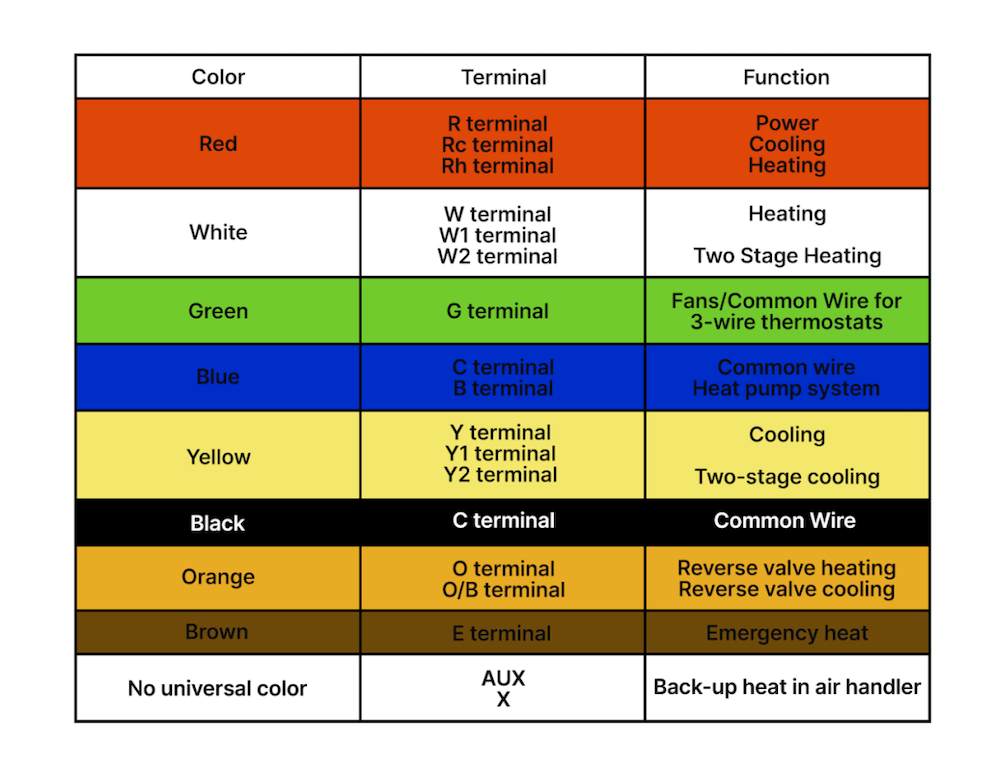
Most two-wire systems are primarily used for line voltage thermostats that provide heating only and feature one red and one white wire. Red wires or R-wires, labeled either as “R”, “Rc” or “Rh” on the terminals are for their power source and white wires or W-wires are for heating. If your thermostat is for air conditioning only, you'll have an Rc wire. But if you have both heating and cooling, you'll have both Rc and Rh wires.
Three wires

Three-wire systems are most common for heaters, boilers, and hot water heaters. These systems include one red wire, one white wire, and one green wire. These green or “G” wires in a three-wire system are used as the common wire.
Four wires

For most battery-powered thermostats, you’ll typically see a system with four wires. These consist of red, white, green, and blue wire. While the red and white wires control power and heating, the green wire controls fans, and the blue “C” or “B” are either your common wire or for your heat pump.
Five wires

The most common wiring system usually features five wires. These include red, white, blue, green, and yellow wire. The yellow Y-wire is typically for your cooling system and the blue, or sometimes black, wire is the common wire. Your Y wires may connect to a Y1 or Y2 terminal if you have two compressors.
Common "C" wires
Common “C” wires are connected to the transformer and provide a continuous flow of power to the thermostat. These wires are typically either blue or black and connect into the “C” terminal. They can be hard to find, so make sure to look either inside the furnace or inside the wall. If you have a line voltage thermostat, you likely won't have a common wire.
Thermostat wiring color codes
How to replace your thermostat
Remove the faceplate

Image source: Home Depot
First things first, make sure to shut off the power on your fuse box for the thermostat, air conditioner, and furnace. Then, carefully remove the faceplate of your thermostat and take a photo so you have an easy-to-follow wiring diagram.
Look for the common wire

Next, look for the “C” or common wire, which provides continuous power to your thermostat. Technically, the red wire provides power but not continuously on its own. Sometimes common wires are tucked behind the thermostat.
Disconnect the wires
Once you’ve located all the wires, taken a photo, and labeled where everything goes, it’s time to disconnect the wires and the mounting screws. Make sure to tape the wires down so they don’t fall inside the wall. Remove any anchor screws and the backplate of the existing thermostat.
Install a new thermostat

After removing the old thermostat, it’s time to screw in the new one. Place the new thermostat control board against the wall, attach the backplate with the mounting screws, and reconnect all of the new wires into their corresponding terminals.
When everything’s reconnected and mounted to the wall, go back to the fuse box and turn everything back on. Give your thermostat a few minutes to activate and re-check your wire connections or hit the reset button if your heating and cooling system doesn’t kick in.
Thermostat wiring: in summary
Whether you’re having issues with your thermostat or want to upgrade to a newer one, knowing how to wire a thermostat is an easy and essential home improvement task. As long as you keep track of what type of thermostat you need and the wires are connected to their respective terminals, you’ll be in good shape.