
Nothing quite lights up a room than a skylight. This bright addition to your home will bring in more natural light, provide ventilation, bring in fresh air, save energy costs, and add resale value. Installing a skylight may seem like a daunting task, but is entirely possible to install one yourself. In this article, we'll explain how to install a skylight, tips before installation, and how much you can expect to pay.
What to remember before installing

Image source: Plasticine House
Any DIY home improvement project requires careful planning and preparation. Before making any cuts or purchases, let’s take a look at some key things to consider before installing a skylight yourself.
Quality
If you're going to install a skylight, we recommend going all the way. This means not skimping on cheaper and lower-quality materials. Look for skylights and skylight kits with sustainable, energy-efficient qualities like VELUX skylights, which provide UV protection, glass shading, ventilation, and water tightness.
Location
Deciding where on your roof to place your skylight is incredibly important. Installing west or south-facing skylights will bring in a considerable amount of heat. East or north-facing skylights will bring in indirect sunlight, but still enough to illuminate the room and is a better option for any DIYer.
Waterproof
Perhaps the most important thing to remember before installation is waterproofing. Skylights can be a source of water leakage or damage, so it’s important to install flashing which typically comes with any new skylight or flashing kit.

Image source: City Lifestyle
Roof slope
Knowing your roofing slope is key to installing skylights. While some curb-mounted skylights are available for flat roofs, we don't recommend installing one without a professional skylight installer. Flat roofs are known to collect water and moisture, which requires costly repairs and maintenance.
Different roof slopes will dictate how water runs off your roof and affects your skylight, so be sure to check your roof pitch and you'll be able to buy the corresponding flashing kit. If the pitch of your roof is below 3:12, use a curb-mounted skylight and if your roof pitch is above 3:12, use a deck-mounted skylight.
Permits
The final thing to remember is permits! Most regions require specific building permits that meet local codes for load and wind resistance. Also, if you want to install a skylight in a room with an attic above, you’ll probably need to install a light shaft which can be labor-intensive.
Types of skylights
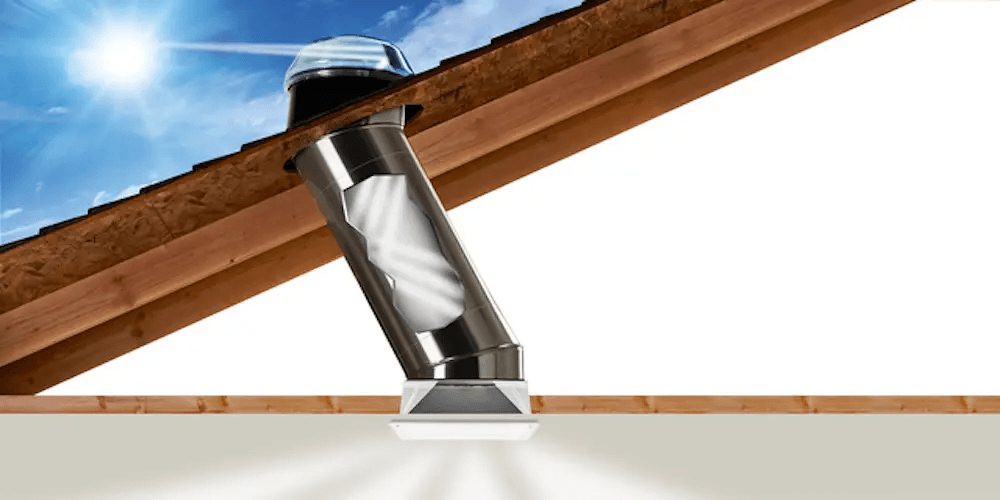
Image source: Las Vegas Review-Journal
Tubular skylights are the easiest kind to install yourself. These skylights feature an acrylic dome that captures the sunlight and travels through a steel or aluminum tube and is diffused through some kind of circular dome in the room.
Fixed
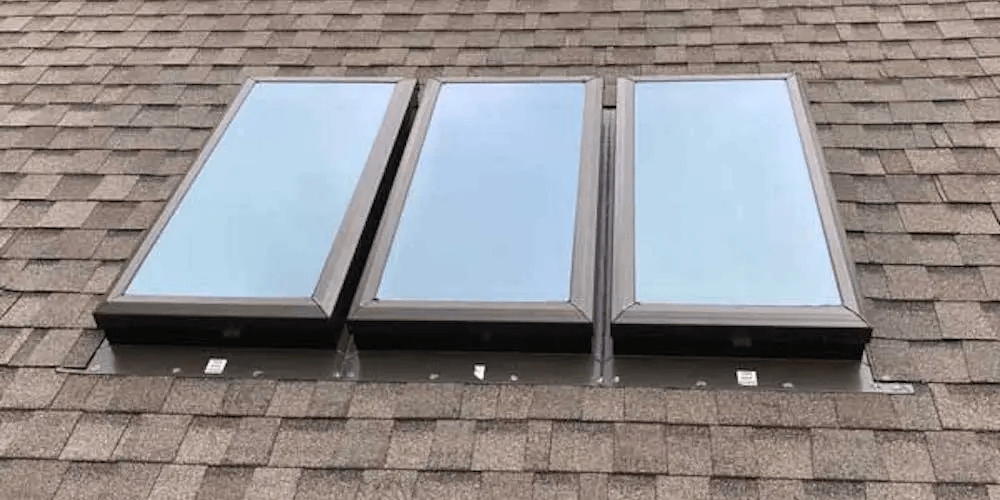
Image source: Top Hat
Fixed skylights are your typical skylight that does not open or close, so ventilation could be an issue. Fixed skylights provide more light and can be more energy efficient with tints, reducing cooling costs.
Vented

Image source: Skyspan
Vented skylights are windows that open and close to allow air into the home. While these skylights offer easy ventilation and natural lighting, they can also be difficult to do-it-yourself and may require a professional roofer.
How to install a skylight
Though there are several different types of skylights with different ways to install them, we’re going to focus on how to install a standard fixed skylight. Here’s the rundown.
1. Cut and frame
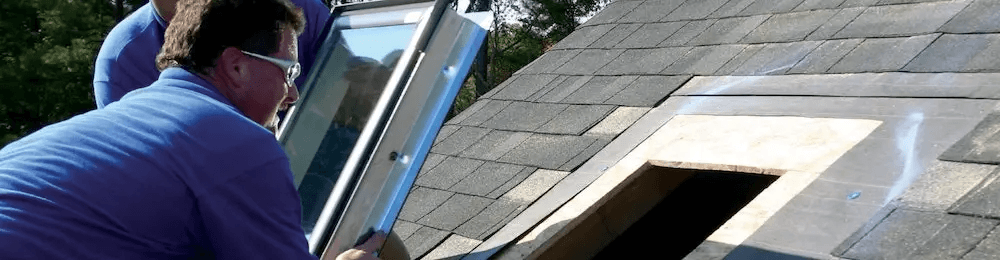
Image source: DIY Network
Once you've picked a location for where you want to place the skylight, it's time to get to work. You're going to need a circular saw, a hammer, a drill, roofing nails, a roofing nailer, chalk line, utility line, and a harness for your protection. Depending on your skylight size, follow the installation instructions included to determine your cutting measurements. If you have roof trusses, we suggest checking with a building inspector since modifications could damage its structural integrity. With rafters, you'll need to locate the rafters with a stud finder and mark the locations between them, usually 2 feet apart.
Make a rough cut along your measurements and remove any insulation between the rafters. From inside you’ll need to screw a hole through the ceiling drywall and through the roof to each corner of where your opening will be.
On the roof, mark chalk lines where the screws are, and remove existing underlayment and strip the shingles at least 7 inches beyond your markings. Then, cut through the sheathing and other roof layers with a circular saw. If necessary, use 2x4 lumber boards to form your frame around the roof opening.
2. Place the skylight

Image source: VELUX
Next, center the skylight over the opening and secure it in place with nails provided in your kit. Then you’ll need to install the water and ice shield. Start by removing the cladding around the sides and cut the adhesive underlayment at least 6 inches from each corner of the skylight. Start at the bottom, then up the sides, and finally on the top. Then cut the adhesive and wrap it around all of the corners and sides of the skylight.
3. Flashing

Image source: Skylight Specialists
First, you’ll need to install the bottom row of shingles and place the sill flashing on the bottom of the skylight on top of the shingles and nail it in place. Interweave shingles over the sides of the step flashing. After installing the shingles and step flashing, replace the cladding along the sides of the skylight and finally install the saddle flashing on the top.
Use another piece of the ice and water shield underlayment and place it on top of the saddle flashing. Then finish nailing on the remaining shingles around the skylight.
In summary
There’s no doubt about it, skylights can be a wonderful addition to your home. They bring in more natural light and ventilation, increase curb appeal, and help save energy costs. While hiring a contractor to install a skylight can set you back financially, it is entirely possible to do it yourself. Thankfully, there’s a large variety of options to choose from. With a handful of tools and a little elbow grease, you can install your very own skylight.
Chris Gennone is a content specialist and video producer at Fixr.com. He has 5 years of experience writing and editing for a variety of web and print publications, currently specializing in home improvement projects such as roofing, remodeling, and repairs. When Chris isn’t writing or in front of the camera, he’s either playing with his band or tracking down the best sandwich shops.