
Updated: January 27, 2026
Written by Dan Simms
Dan was a property manager from 2015 to 2020, during which time he managed and oversaw the upkeep and repairs of over 2,000 residential properties. He uses that experience, as well as his extensive DIY knowledge, to bring reliable information to homeowners about renovations and home-related projects. Since 2020, he has been using his experience to write about home improvement, and his work has appeared on sites like USA Today, CNN, Angi, and Today’s Homeowner.
Learn moreReviewed by Dan Simms
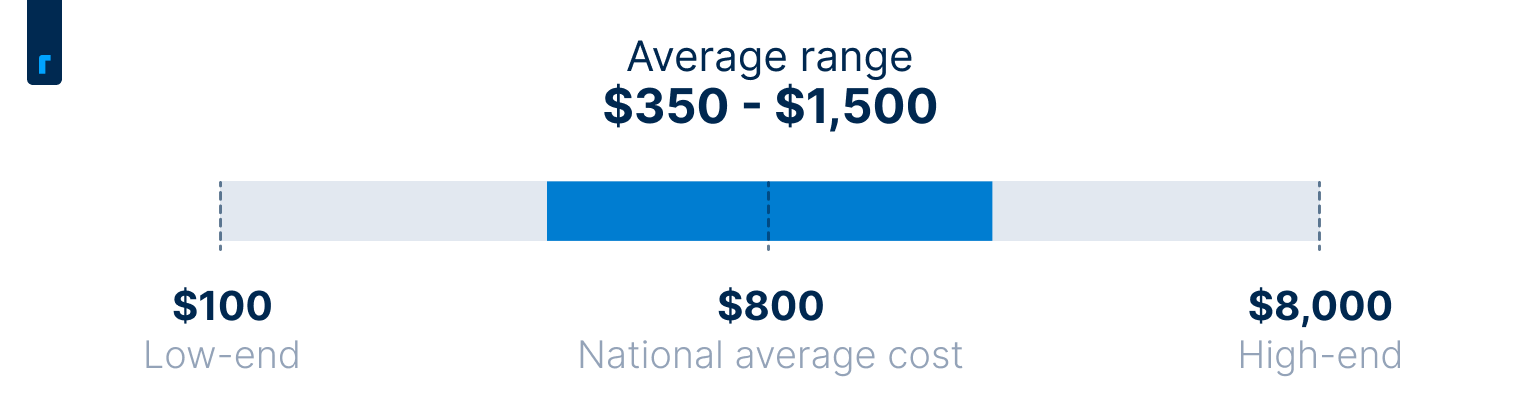
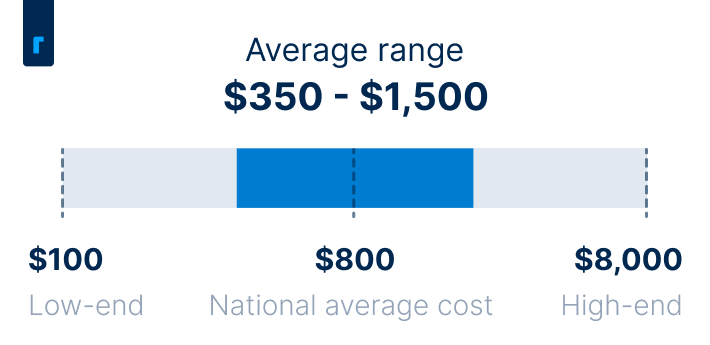
Roof leak repair costs an average of $800, and most projects total between $350 and $1,500. Your overall cost will depend mostly on the extent of the damage, the type of repair you need, the type of roofing material you need to repair, and the labor rates in your area. You could pay as little as $100 if you just need minor repairs to a leaking vent boot or to replace a missing or damaged asphalt shingle, but prices can climb to $8,000 or more if the leak leads to structural damage.
Your roof is one of the most important parts of your home that keeps you, your family, and your belongings safe from the elements. It protects everything underneath from rain, snow, and wind, and it plays an important role in your home’s energy efficiency, which means it affects utility bills and even indoor comfort. Roofs see a lot of wear and tear, and it’s important to address roof leaks quickly to prevent further damage to your roof or home.
Leak in Roof Repair Cost
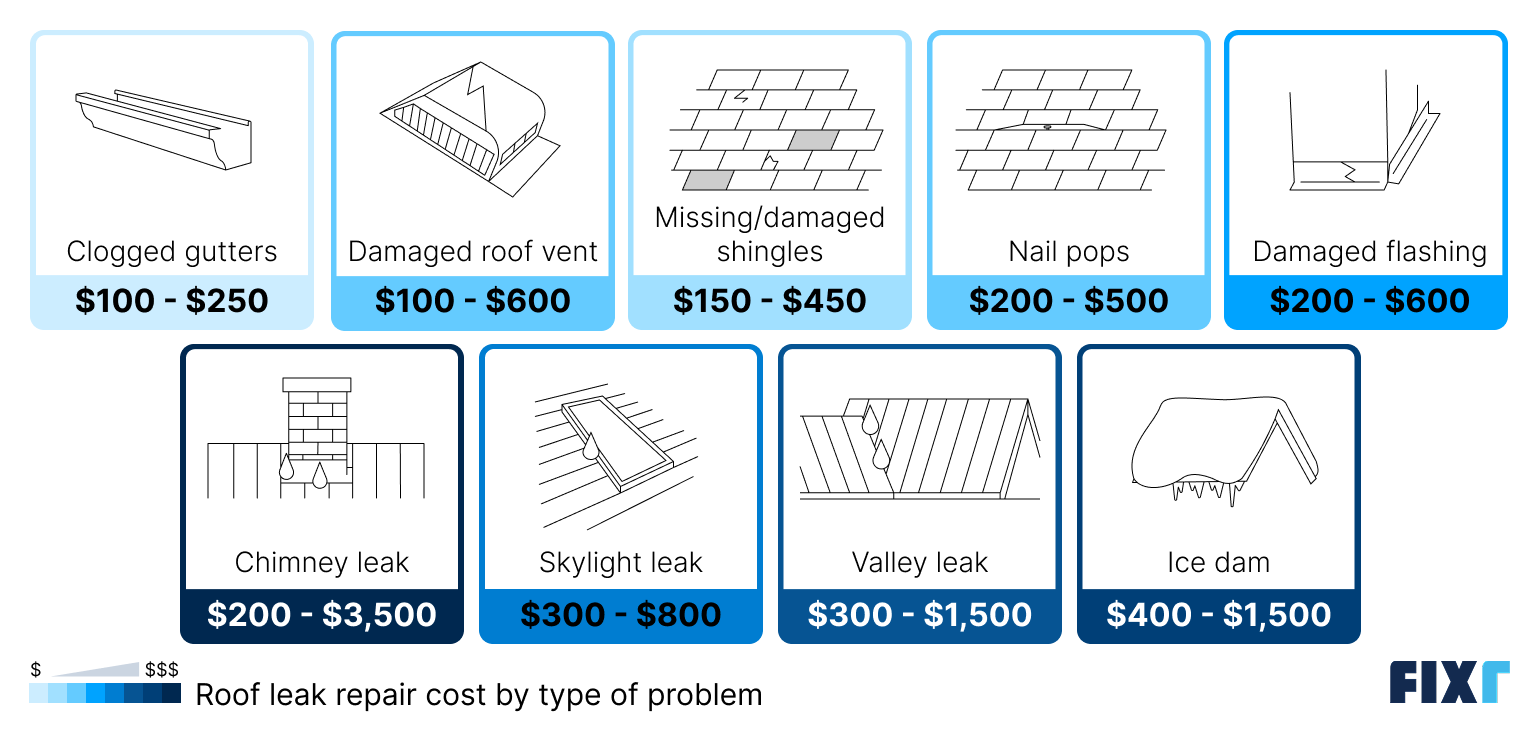
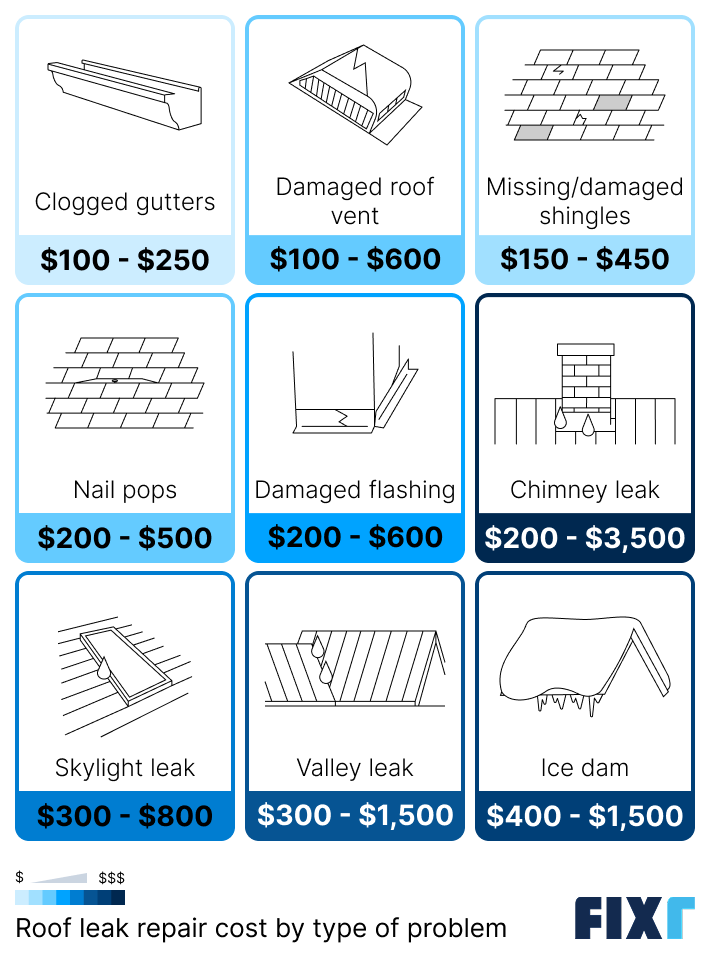
Roof Leak Repair Cost by Problem
Many underlying issues can lead to roof leaks, and the underlying causes of roof leaks and the type of repair you need will affect your costs more than any other factors. Below, we’ll include a breakdown of roof leak repair costs based on the specific damage you’re experiencing and the work involved in correcting the problem.
Type of Repair | Cost Range |
Clogged gutters | $100 – $250 |
Damaged vent boot | $100 – $600 |
Missing/damaged shingles | $150 – $450 |
Nail pops | $200 – $500 |
Damaged flashing | $200 – $600 |
Chimney leak | $200 – $3,500 |
Skylight leak | $300 – $800 |
Valley leak | $300 – $1,500 |
Ice dam | $400 – $1,500 |
Unclogging Gutters
Clogged gutters cost between $100 and $250 to unclog and repair. This can be one of the most affordable types of leak repair, as you could just need a gutter cleaning service. However, if your clogged gutters have been spilling water behind your soffits for an extended period of time, you could pay significantly more to repair the resulting water damage.
Repairing a Cracked Vent Boot
Roof vent leak repair costs between $100 and $600. Roof vents are a normal part of most homes and can serve many purposes, from letting air flow through your plumbing system to venting out heat and fumes from appliances. To keep water out, a rubber “boot” is placed around the base of the vent pipe. If this boot cracks or wears out, it can break the seal and let water leak into your home.
Replacing Missing or Damaged Shingles
Replacing missing or damaged shingles costs between $150 and $450, in most cases, depending on the number and type of shingles. This is one of the most cost-effective roof problems to fix because, in most cases, the damaged area is relatively small due to localized storm damage from hail, fallen tree limbs, or blown debris. Costs can climb higher if you need a larger area repaired.
Improperly Nailed Shingles/Nail Pops
The cost to renail shingles that were not properly fastened will usually fall between $200 and $500, depending on the number of shingles that need to be renailed. Nail pops can occur with rapid changes in humidity, which causes the wood receiving the nail to expand and contract, creating a potential entry point for water. This can also happen with screws on metal roofing.
Repairing Cracked or Missing Flashing
Repairing damaged roof flashing usually costs $200 to $600. Flashing is thin metal installed around chimneys, vents, skylights, and roof edges to keep water out. If it gets bent or damaged by wind, hail, or debris, leaks can form. Fixing flashing quickly helps prevent costly water damage.
Repair a Leaking Chimney
Repairing a leaking chimney usually costs $200 to $3,500. Minor roof repairs, like replacing a chimney cap, fall at the low end of the range, while major work to fix damaged bricks, mortar, or flashing can reach the high end. Chimney leaks are most often caused by damaged flashing, but cracks in the mortar or the bricks themselves can also let water in. Addressing leaks early can help prevent more extensive and expensive damage to your roof and home.
Leaking Skylight Repair
Fixing a leaking skylight costs between $300 and $800. The repair could cost up to $2,800 if you need a full replacement. Flashing repair and window seal repair will fall on the more affordable end of the range. If your skylight leak has been ongoing, prices could climb higher if you need repairs to structural issues, as well.
Roof Valley Leaks
Roof valleys are the creases that exist where two downward roof slopes meet at an angle, and these can leak for a variety of reasons, including flashing damage or simply an accumulation of debris that holds moisture against your roof. Repairing a valley leak costs between $300 and $1,500. Not all roofs have valleys, but those that do have an increased risk of leaking where they occur.
Ice Dams Causing Leaks
Removing ice dams from your roof and repairing related damages, like uplifted shingles or water damage, costs between $400 and $1,500. Ice dams form when snow on your roof melts, runs to the edge, and refreezes. This can force water under your shingles, causing leaks. It can also lead to more extensive roof damage that drives up repair costs. It’s a good idea to couple this repair with added insulation under your roof to prevent future issues.
Leak in Roof Repair Cost by Material
The roofing material you have installed will affect your roof leak repair costs in several ways. First and foremost, different materials come with varying risks of leaks, so long-term leak repair costs can fluctuate with your roof type. Material costs can also vary widely when it comes to repairs, and labor costs range based on how much work is necessary to uncover the damage and replace the roofing around the area.
Asphalt shingles are the most affordable roofing material to repair, and slate tends to be the most expensive.
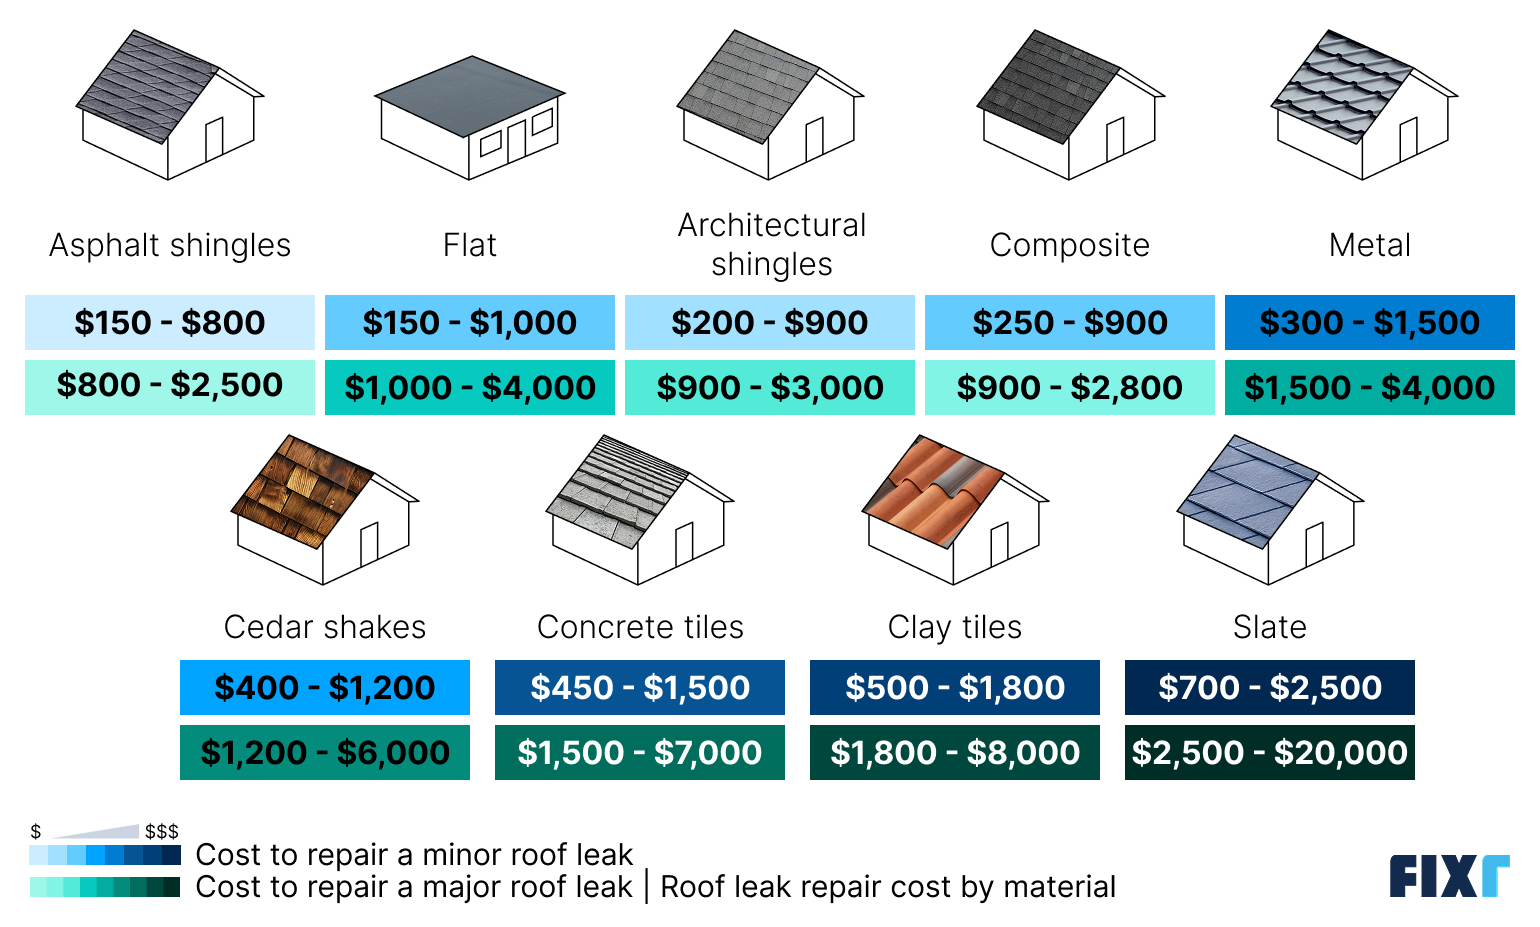
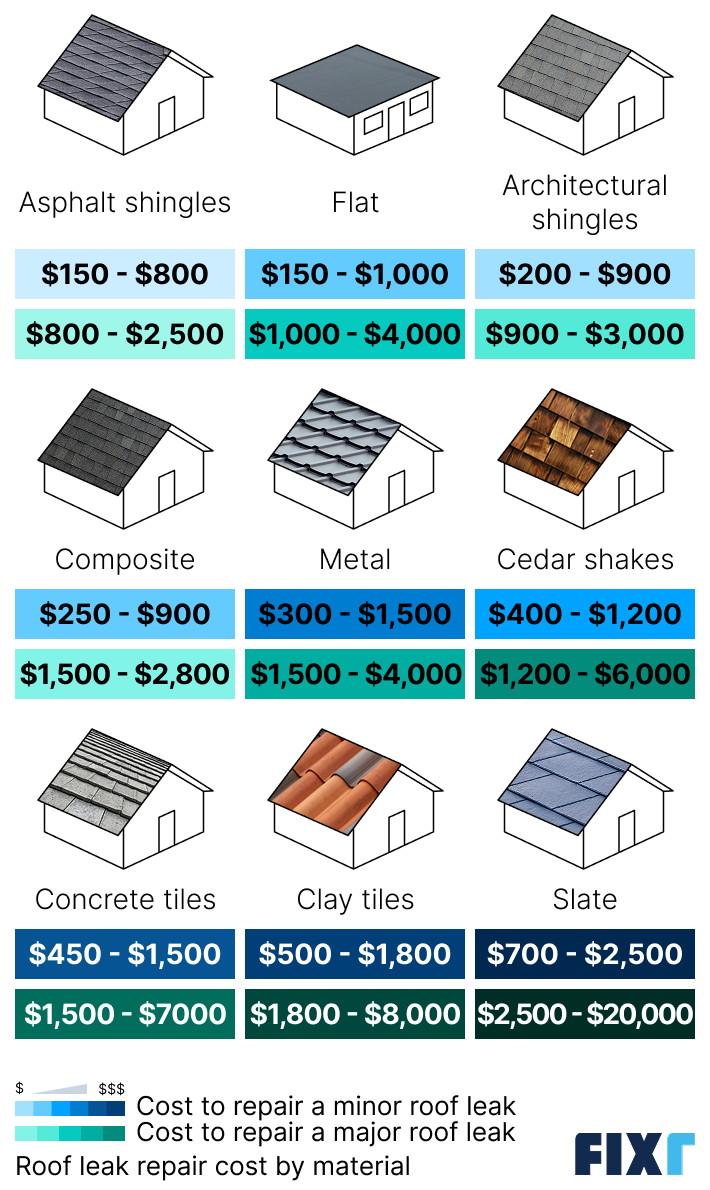
Roof Material | Average Cost to Repair a Minor Roof Leak | Average Cost to Repair a Major Roof Leak |
Asphalt shingles | $150 – $800 | $800 – $2,500 |
Flat | $150 – $1,000 | $1,000 – $4,000 |
Architectural shingles | $200 – $900 | $900 – $3,000 |
Composite | $250 – $900 | $900 – $2,800 |
Metal | $300 – $1,500 | $1,500 – $4,000 |
Cedar shake | $400 – $1,200 | $1,200 – $6,000 |
Concrete tile | $450 – $1,500 | $1,500 – $7,000 |
Clay tile | $500 – $1,800 | $1,800 – $8,000 |
Slate | $700 – $2,500 | $2,500 – $20,000 |
Most roof leak repairs tend to fall within the minor repair ranges listed. Major repairs are less common and usually occur only with severe damage. Prices can vary based on your roof’s size, materials, and the extent of the damage.
Asphalt Shingles
Repairing a minor leak on an asphalt shingle roof costs between $150 and $800, while a major leak can cost from $800 to $2,500. Asphalt shingle roofs leak for many reasons, including improper nailing, splitting, cracking, or missing shingles. As the most common roofing material in the U.S., repairs are generally straightforward and affordable due to material and labor availability, making it a relatively quick fix for professionals.
Flat Roof
For flat roofs, a minor leak repair typically costs between $150 and $1,000, with major repairs ranging from $1,500 to over $4,000. Repairs could result from punctures due to blown debris, foot traffic, UV exposure, old age, or general wear and tear. The flat roof material you have will affect how easy it is to repair your roof type, as well as the average repair costs. Built-up roofs tend to be the easiest and cheapest to repair.
Architectural Shingles
Repairing a minor leak on an architectural shingle roof costs approximately $200 to $900, with major repairs ranging from $900 to over $3,000. Architectural shingles are a type of asphalt shingle roofing, but they cost more to repair because of the higher material quality and associated material costs. The good news is that these roofs are far less likely to leak than standard asphalt shingles because they stand up better to wind and impact.
Composite
Minor leak repairs for composite roofs cost $150 to $900, while major repairs can range from $900 to $2,800 or more. The most common fix involves addressing cracked, separated, or curling shingles. These repairs are typically applying sealant or replacing individual damaged shingles. Costs vary widely depending on the specific synthetic material used in the composite shingle.
Metal
A minor metal roof leak repair costs between $300 and $1,500, while major repairs can cost from $1,500 to over $4,000. Leaks are relatively rare for most metal roofs, since metal is non-porous, and the most common type of metal roof, a standing seam metal roof, has hidden fasteners and large panels that naturally resist leaks. The most common repairs involve addressing leaks at fasteners or seams by replacing screws or applying new sealant.
Wood
A minor leak repair for a cedar shake roof ranges from $400 to $1,200, with major repairs costing $3,000 to $6,000 or more. Wood roof leak repair is a bit less common than other types because wood roofs are less prevalent in areas that see heavy rainfall and snowfall. A unique issue plaguing wood roofs is rot, which spreads quickly and can lead to severe structural damage, so all-in costs could be much higher if your leak has been an issue for a long time.
Concrete
For concrete tile roofs, a minor leak repair costs between $450 and $1,500, while major repairs can range from $1,500 to $7,000. The main trait of these repairs is the need for skilled labor to handle the heavy material. The costs are driven by underlayment replacement needs, which require the time-consuming process of removing and reinstalling large sections of tile
Clay Tile
Minor leak repairs on clay tile roofs typically cost $500 to $1,800, but major repairs involving underlayment can exceed $8,000.The most common fix is replacing individual tiles that have cracked from impact or slipped out of position. Most people find that leak repair involves installing a new section to replace the damaged area, which is a much bigger project than resecuring existing roofing material.
Slate Roof
Minor slate roof leak repairs range from $700 to $2,500, while major repairs involving flashing can exceed $20,000. A leaking roof usually results from a missing or cracked shingle, but you’ll need repairs far less often than with other roofs because slate is the most durable and resilient roofing material. Slate is extremely durable but brittle, so repairs require artisan-level skill to prevent causing more damage. Even small fixes are expensive due to the high cost of specialized labor
Other Factors That Affect the Cost
The underlying cause of the leak, the extent of the damage, and the type of roof you have are the most important cost factors to consider, but there are many other factors that can play a more minor role in your total.
Labor and Time
On average, labor accounts for around 60% of your total. Labor costs vary based on how easy your roofing material is to work with and also the extent of the damage. Expect to pay far higher costs for labor if your roof leak has led to water damage, mold growth, or rot on structural components or decking under your roof.
Extent of the Damage
The cost of roof repair varies with the severity of the damage. Minor, localized issues, like a few lifted shingles, are far less expensive to fix than a persistent leak that has damaged the underlying roof structure. Similarly, localized damage on a few square feet of your roof will cost far less to repair than widespread damage from an aging roof that would benefit from a full roof replacement. Here’s a breakdown of roof repair costs by severity:
Minor roof leak repair costs: Minor roof leak repairs include quick replacements of roofing materials where a small amount of localized damage has occurred and hasn’t led to major damage under your roofing. Small roof leak repairs cost between $150 and $800, in most cases.
Moderate roof leak repair costs: Moderate roof leak repairs include those that have caused a small amount of damage to the building materials under your roofing, as well as damage to bigger sections of your roof. Moderate roof leak repairs cost between $800 and $3,000, on average.
Major roof leak repair costs: Major roof leaks include those that have been ongoing and have caused severe damage to your roof decking, insulation, and structural components under your roof. These are the most severe and invasive repairs, and they can cost up to $8,000.
Roof Complexity and Pitch
Steep roofs are more dangerous and more challenging to work on, and they often require special safety equipment that can extend repair timelines and drive up labor costs. Complex roof designs are also more likely to cost more to repair because there are additional valleys and areas of flashing that can potentially fail and require more extensive repairs.
Location
Where you live will play a major role in your labor costs, which scale based on the local cost of living. Expect to pay higher roof leak repair prices in areas where labor is more expensive, like in and around major cities and in states where real estate and living costs are higher.
Your location can also play a part in the extent of the damage resulting from a roof leak. For example, homeowners in Phoenix will very rarely face major roof leaks because the city gets just 7 inches of rain per year. In arid climates, even severe roof damage is unlikely to lead to extensive repairs resulting from water damage.
Roof Age
The age of your roof can affect how well it stands up to physical wear and water intrusion, so it has an impact on the likelihood that you’ll face roof leaks to begin with. The roof age can also help determine if a total replacement would be a wiser option, though, which can affect your total costs dramatically. If an old roof means a replacement is a better option, you’ll pay significantly more for a permanent solution.
Additional Fees
Roof repair in some municipalities will require permits, and permit fees can add $50 to $500 to your total, depending on the scope of work and the fee schedule your building department uses. You may also need to pay extra to dispose of any old roofing material your pro removes.
Emergency Roof Repairs
If a roof leak is severe or sudden, such as after a storm or a fallen tree, emergency repairs may be needed. These services often cost more than standard repairs because they require immediate response, temporary fixes to prevent further damage, and sometimes after-hours labor. Planning ahead with routine inspections can help reduce the likelihood of costly repairs.
Repair vs. Replace a Leaky Roof
If you find evidence of a roof leak, the first thing you should decide is whether a repair or a complete replacement is the best option for your particular case. A roof replacement costs an average of $10,000, so it will almost always be more expensive than a roof repair, which averages $900. However, there are some cases when a total replacement makes more sense. Consider replacing over repairing if any of the following are true in your case:
Your roof is close to the end of its life: If your roof is within a few years of its expected lifespan, then a replacement is probably best. You’ll still pay more upfront, but over time, you’ll save money compared to repairing now and replacing in a few years.
Your repair costs are 50% or more of a replacement cost: Major repairs that affect large portions of your roof could lead to repair costs that are close to full replacement costs. If repairs will cost 50% or more of a full replacement, a replacement is a better financial option in the long run.
You have severe damage to your decking or structural components: Major or ongoing roof leaks can lead to hidden damage under your roof materials. If you suspect damage to decking or structural components, replacing your roof gives you the opportunity to address all of the damage at once to ensure it’s not an ongoing problem.
You’ve had recurring issues with roof leaks: If you’re dealing with roof leak after roof leak, there’s probably something wrong with the way your roof was installed. In that case, a full replacement can fix the underlying issue and save you money on repeat repairs over time.
How to Save on Roof Leak Repair Costs
Roof leak repairs can cost you thousands of dollars, so understanding the different ways to keep costs as low as possible can save you a significant amount of money. Here are some tips for keeping roof leak repairs as affordable as possible:
Schedule annual roof inspections: Annual roof inspections are the best way to stay on top of maintenance and catch minor damage before it turns into a major problem. Annual roof inspections cost around $430, on average, but they can help avoid thousands of dollars in repairs.
Carry out regular maintenance: This can be as simple as cleaning your gutters one to two times a year, trimming branches away from your roof, and repairing minor damage before it gets worse.
Check for warranty coverage before you repair: Many roofing products come with manufacturer’s warranties, which may cover a portion of the repairs if your roof fails prematurely. Check to see if your roofing contractor or roofing company offered a labor warranty, too, as this may cover your roof repair costs if improper installation was the underlying cause of the damage.
Avoid emergency repairs, if possible: Roofers charge higher fees for the inconvenience of emergency repairs. Catching damage early means you can often wait short periods before repairing, which can lead to lower costs.
Schedule repairs for the off-season: If you have very minor damage and can wait weeks or months without your property sustaining further damage, schedule the repairs for the off-season when labor costs tend to be lower. The off-season for roofing is the winter and spring.
Address the underlying issue: Finally, make sure you don’t just put a band-aid on your roof issue and instead fix the underlying issue. Roof leak issues can persist if you don’t fix the source of the problem, like clogged gutters, untrimmed trees, or a poor roof material choice for your climate.
DIY vs. Hiring a Professional
Fixing a roof yourself can save a few hundred dollars, but it’s only practical in certain situations. DIY repairs are usually limited to simple, obvious issues, like a damaged or missing shingle, on an accessible asphalt shingle roof. You also need to feel comfortable and safe working on your roof. For more complex problems, leaks that aren’t easily located, or roofs with multiple layers or other materials, it’s much safer and more effective to hire a professional who has the experience, tools, and safety equipment to fix the problem correctly and prevent further damage.
FAQs
Homeowner’s insurance may cover roof leak repair if your roof sustained sudden and unexpected damage from a severe weather event, like a tornado, hurricane, tropical storm, wind storm, or hailstorm. In all other cases, especially if the leak is a result of old age, homeowner’s insurance isn’t likely to cover repairs, as they’re considered routine maintenance that falls under the homeowner’s responsibility.
On average, a roofer will charge $800 to fix a roof leak, and prices generally range from $350 to $1,500, depending on the cause of the leak, the extent of the damage, and the type of roof you have. For extensive leaks that require repairs to roof decking or structural components, you could pay as much as $8,000.
Leaky roof repair costs are usually more affordable than full replacements, but the option that works best for you depends on a few factors. If your roof has more than half of its expected life left in it and hasn’t given you repeated issues with leaks, then a repair is probably best. If your roof is nearing the end of its life and has had recurring problems with leaks, or the damage has spread to decking or structural components, a total replacement is a better option.
The simplest temporary solution to fix a leaky roof is to install a tarp over the leaking area and use two-by-fours or similar lumber to secure the tarp to the roof and prevent uplift. This is only a good temporary solution, though, because the fasteners that hold the wood down will create new entry points for water. Tarping can temporarily minimize ongoing water damage, giving you time to schedule a more permanent repair.
The best way to fix a leaking roof is to quickly identify the leak’s source and make a targeted repair, usually by replacing damaged shingles or flashing. Most leaks start around chimneys, vents, or skylights. Temporary patches rarely last; aging roofs often require partial or full replacement.