
Drafty windows are like cracks in your home’s armor that let out heated or cooled air. This can make the place less temperate and increase your energy bills, so it’s essential to eliminate air leaks in your windows as soon as you notice them.
Luckily, you don’t always have to get new windows to improve your home's energy efficiency. There are plenty of affordable and easy ways to reseal old, drafty windows, and most homeowners can implement them with the right equipment and know-how.
Keep reading and we’ll teach you how to seal windows with caulk, make draft snakes for leaky window sashes, use thermal window treatments, and more.
How to find air leaks in your windows
If one of your rooms is always cooler or warmer than the rest of the house, you should check every window in that room for air leaks. It’s likely you’ll find at least one.
Here are a few different methods for finding air leaks in windows:
Closely inspect the window’s frame for cracks
The quickest way to check a window for an air leak is to look for cracks around its seal or frame. If you find an obvious crack in the frame or caulking, hold your hand over it. If you feel a small draft or the air around the crack is a different temperature from the rest of the room, you’ve found an air leak.
Not all air leaks are easily visible, though, so you won’t be able to find every air leak this way. If you think a window may be drafty, but you can’t see any cracks, there are a few other ways to test for a leak.
Try the candle method
Light a candle, hold it in your hand, and slowly pass it in front of a window’s corners and edges. Any spot where the flame stays upright isn’t leaking air, but if the flame or its smoke bends toward the window frame in one particular spot, the air is leaking from that spot.
If you don’t have a candle handy, you can just do this method with your hand. Your skin may not be sensitive enough to detect the smallest leaks, but simply using your hand to feel for heat loss or air movement around your window’s frame should be sufficient for finding significant drafts.
Attempt to rattle the window
The final way to test a window’s leakiness is to place your hand on the window and push against it quickly yet gently. If it rattles, some part of the window isn’t airtight and is leaking around the edges. You may have to do this a few times to pinpoint exactly where the air is leaking from, though.
If the glass itself is what’s rattling, then the glazing is loose and leaking air. If one of the window sashes or the window frame is the source of the rattling, that’s where the leak is. In some cases, both the glazing and the frame might be loose and require resealing.
Easy and affordable DIY fixes for drafty windows
Once you’ve identified which windows are leaking air and why, it’s time to seal up the leaks. The right sealing method will depend on which part of your window is leaking, though, so peruse the various options carefully.
Use caulk to seal your window

Replacing the old caulk around your window frame with fresh material will seal up leaks in your window’s perimeter. Image source: Home Depot
Caulk is one of the best materials for sealing up windows, and it can be applied to various types of air leaks. You can use caulk to fill cracks in a window frame, secure glass panes in their sashes, and reinforce the perimeter where your window frame meets your wall.
When insulating a window with caulk, you’ll need a caulk gun, some protective gloves, a putty knife, and, of course, a tube of caulk. Some caulks are intended for interior use while others are better for a window’s exterior, so be sure to pick up a tube that’s made to use on whichever side of your window you’re caulking.
If you don’t want to use a caulk gun, you can get some rope caulk instead. You apply this type of caulk by unspooling it like string and pressing it into cracks instead of squeezing it out of a tube.
Using caulk on your window frame
If cracked or loose caulk around your window frame is the source of your window’s draftiness, you should remove the old caulk and replace it. Start by scraping out the old caulk with your putty knife. Once you have an edge of the old caulk out, you can pull on it to peel the rest away, though it may break. If this happens, simply start again with your putty knife.
Once you have all the old caulk out, use your caulk gun to apply fresh caulk to the exposed perimeter. Once you’ve applied caulk around your window’s entire frame, smooth the material out by running a gloved finger along it. This will give the caulk a nicely-finished curve and press it firmly down into the gaps.
During this process, you should quickly wipe away any mistakenly applied caulk or errant drips with a paper towel. Caulking mistakes are much harder to correct after the caulk dries.
Once you’ve got all your caulk down, let it dry completely before using the window. Follow the drying instructions on the tube’s label, and don’t be tempted to speed up the process with a hair dryer. Exposing fresh caulk to especially warm air will actually make it dry slower.
Using caulk to secure a pane of glass
If your glazing is loose and rattles in its frame, some new caulk can secure it to prevent it from leaking air. Your window’s glazing likely has some caulk around its edges already, and if this is the case, you’ll need to gently scrape it with your putty knife and peel it all away before getting started.
Once you’ve got the old caulk out, go around the edge where your glazing meets the window frame with your caulk gun, filling the gaps with new caulk. Then, use a gloved finger to smooth it all out and press it firmly into the cracks. With this done, wipe away any excess material then allow the caulk to dry completely before using the window again.
If, after the caulk is dry, you notice some stray material smeared on the glass, carefully scrape it off with your putty knife.
Using caulk to seal up cracks
If there are some small cracks in your window frame where air leaks through, you can apply small amounts of caulk into these crevices to seal them up.
Start by cleaning out the cracks as best as you can with a shop vac or paper towel. This will remove loose dust, splinters, and other debris that can impede adhesion. Then, once you’ve got the crack cleaned out, squeeze a few beads of caulk into the crack, smooth it all out with a gloved finger so it’s flush with your frame, then let it dry.
If your frame is a different color from the caulk you’re using, you may be able to paint over the caulk when it’s dry. Be sure to check the label before attempting to paint over your caulk.
Spray foam under the window’s trim
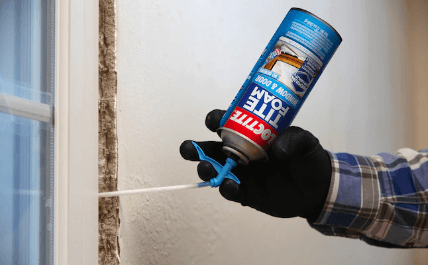
If air is leaking away through your window’s trim, you may need to spray foam into the cracks between your window frame and the wall. Image source: Lowe’s Home Improvement
If you find air leaks in your window’s trim, caulk alone probably won’t solve the problem. Instead, you’ll need to go to the store to pick up a can of spray foam, some protective gloves, a putty knife, and a pry bar if you don’t already own one.
Once you have these items on hand, use the pry bar to carefully remove your window’s trim. This will expose the crack between your window’s frame and the drywall. Take this step slowly to prevent cracking the trim, and pay special attention to how the trim sits on your wall. You’ll want to put it back exactly how you had it once you’re done. And be sure to save all the nails that were holding the trim in place.
After you’ve removed the trim, go around the window with your can of spray foam, completely filling every gap between your drywall and the window’s frame. As you spray, the foam will quickly expand and dry, and it may look lumpy. Don’t worry about these unsightly lumps, though. They will soon be hidden by your window’s trim.
The foam’s expansion is only a concern if it expands too much to put the trim back. You want the foam to sit entirely inside the crevice, not bulging outward at all or even flush with the wall. Any foam that expands beyond the confines of the crack should be scraped or chipped away with your putty knife.
Once you’ve filled the gap with your spray foam, you’re free to replace your window’s trim exactly as it was and call it a day.
Use weather strips

Foam weatherstripping can prevent air from escaping between the sashes of a single- or double-hung window. Image source: Lowe’s Home Improvement
If air is leaking around a window’s sliding sashes or swinging panels, install foam weather strips along the edges where they meet the frame to prevent air from escaping.
Window weatherstrips are typically made from a strip of soft foam with an adhesive side. This means you can install them on the bottom or inside edges of your panels without preventing them from closing or locking.
To install a weather strip, measure the length of the surface you’ll apply it to, clean the surface thoroughly and let it dry, cut an appropriately-sized length of weather stripping from the roll, and apply the sticky side to the surface. The adhesive on weather stripping is usually very similar to that of tape, so you don’t have to wait for the adhesive to dry before using your window again.
Weather stripping can be stuck to the bottom edge of a sliding sash, the inside edge of a swinging window panel, or across a window sill. And, even if your windows don’t have noticeable drafts, adding some weather stripping to your windows can still help you lower your heating bills in winter.
Make a draft stopper

A draft stopper won’t actually repair an air leak, but it can still prevent air from escaping through a drafty window. Image source: Lowe’s Home Improvement
If money is too tight to pick up the specialized materials and equipment you need to actually fix air leaks, you can still prevent a draft by making a draft stopper—also known as a draft snake. A draft stopper is a long cloth tube filled with insulating material that you can lay across window seams to prevent air from leaking through them.
The simplest way to make a draft stopper is to fill an old tube sock or stocking with uncooked rice or beans and sew up the open end. These stoppers don’t look very pretty, but they get the job done.
Alternatively, if you’re handy with a sewing machine and have some spare materials lying around, you can make a more stylish and decorative draft stopper by sewing fabric into a tube and filling it with batting, fabric scraps, or cotton.
Hang thermal curtains

Insulating curtains are an excellent way to make your windows less drafty while adding a bit of flair to the room. Image source: Bed Bath & Beyond
Thermal curtains are window treatments made especially for insulating your home. They feature more fabric layers than standard curtains, and they’re sometimes crafted with foam inserts for additional insulation. This makes thermal curtains an excellent way to cover up a drafty window and prevent air from escaping your home.
The bad news is that thermal curtains are typically a fair bit more expensive than standard curtains. However, they’ll make your home more energy efficient and bring down your power bills, so they can help you save money in the long run.
Like using a draft snake, hanging thermal curtains over a drafty window doesn’t actually seal up the window’s air leaks. It just minimizes the leakage. If your goal is to fix your window’s air leaks, hang thermal curtains in tandem with one of the actual repair methods we’ve mentioned.
Expensive but effective ways to fix window drafts
Thus far, we’ve only discussed the affordable ways that the average handyman, handywoman, or handyperson could seal up a drafty window. Sometimes, though, you need a solution that only a professional can tackle.
The solutions below may be more expensive than the DIY options we've outlined, but they're some of the best ways to fix drafty windows.
Hire a professional to repair your windows
If you’re uncomfortable sealing up your windows yourself, you can always hire a local professional to fix them for you.
This will give your windows more permanent seals than DIY work would, but it will also cost you a lot more than tackling the job yourself. On average, paying a pro to fix an air leak in your window can cost anywhere from $75 to $600 depending on the problem.
Add storm window inserts
A storm window is an additional window panel you mount over an exterior window to give it extra insulation and protection from nasty weather. If you love your current windows despite their drafts, adding storm windows can help prolong their lives and allow you to keep them without running up your power bills.
Be aware that you should still seal up the original windows with caulk, though. Otherwise, condensation from your home can leak out and build up between them and your storm windows. This moisture can fog your glass, grow mold, and rot or rust your window frames.
One of the best things about storm windows is that they don’t have to be permanent fixtures. Many are designed for easy and repeated installation and removal. If you want to open your windows to enjoy a fresh breeze or you don’t mind your drafty windows in summer, you can remove the storm window inserts and put them back on when you next need them.
Installing a single storm window typically costs somewhere between $100 and $400, so you might have to save up for this solution. It’s the best way to get a new window’s air-tightness without getting rid of your old windows, though, so you may find it worth the cost.
Replace the windows
Sometimes old, drafty windows are beyond saving. If you’ve determined that fixing your current windows would be more trouble than they’re worth, you should probably just get them replaced.
This option comes at a cost, though. Replacing a standard window typically costs somewhere between $550 and $750, but prices can be higher than $10,000 for custom windows.
Despite these high costs, replacing a drafty window is the best way to eliminate window drafts, and it’s also one of the best ways to bring down your utility bills, so it can actually save you money over the course of a few cold seasons.
Drafts be gone!
Drafty windows are one of those thousand seemingly minor nuisances that come with owning a home, and you likely don’t even think about air leaks in your windows unless you’re sitting next to one and it gives you goosebumps. However, your drafty windows are impacting your home’s energy efficiency and your power bills more than you probably realize.
As such, sealing up your old windows or replacing them with newer models should be a priority when you’re trying to make your home more efficient to save money on heating and air conditioning.
Joe is a home improvement expert and content specialist with over eight years of experience writing about home services. As a former member of the Fixr.com editorial team, he produced well-researched, consumer-focused articles covering topics from moving to remodeling. His work has been sourced by major publications including Nasdaq.com and USA Today.
Read more