
Updated: February 4, 2026
Written by Dan Simms
Dan was a property manager from 2015 to 2020, during which time he managed and oversaw the upkeep and repairs of over 2,000 residential properties. He uses that experience, as well as his extensive DIY knowledge, to bring reliable information to homeowners about renovations and home-related projects. Since 2020, he has been using his experience to write about home improvement, and his work has appeared on sites like USA Today, CNN, Angi, and Today’s Homeowner.
Learn moreReviewed by Dan Simms
Your roof protects your home from weather, water damage, and energy loss. Replacing it is a major expense, but it’s often cheaper than waiting for leaks, structural damage, or higher utility bills.
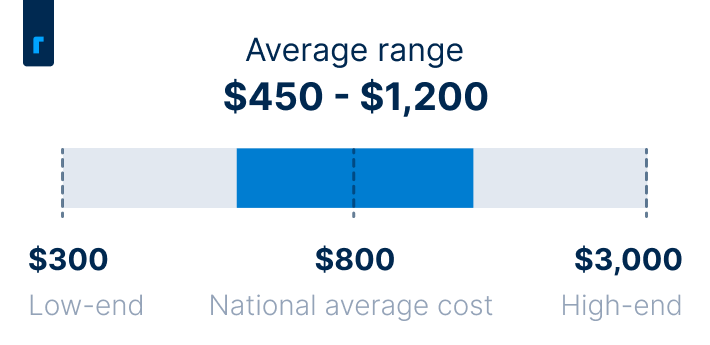
Roof replacement costs an average of $10,000, and prices typically fall between $7,500 and $14,000, depending on your home size, the roofing material you want, the roof style, and the cost of labor in your area.
Average Roof Replacement Cost

Average Cost of Roof Replacement by Roof Size
Roofing contractors usually price out your house roof replacement costs by the square foot or by the roofing square (100 sq.ft.). The average cost is $4.75 per sq. ft., ranging from $3.75 to $11 per sq. ft.
To estimate your cost, calculate your roof’s square footage (not your home’s living space) and multiply by the cost per square foot. Here’s what you can expect to pay based on your roof size:
Roof Size (sq. ft.) | Typical Cost Range |
$3,750 – $11,000 | |
$4,500 – $13,200 | |
$5,625 – $16,500 | |
$6,000 – $17,600 | |
$6,375 – $18,700 | |
$7,500 – $22,000 | |
$9,375 – $27,500 | |
$11,250 – $33,000 |
Cost of Roof Replacement by Material
The cost for roof replacement varies mostly because of the material available. Asphalt shingles are the most common roofing material in the U.S. due to affordability, durability, and ease of installation. A new asphalt roof averages $10,000.
Other materials, such as metal, cedar, and til,e cost more but last longer and offer better curb appeal.
Beyond the upfront cost, you should consider climate resilience, insulation value, and lifespan when choosing roofing material.
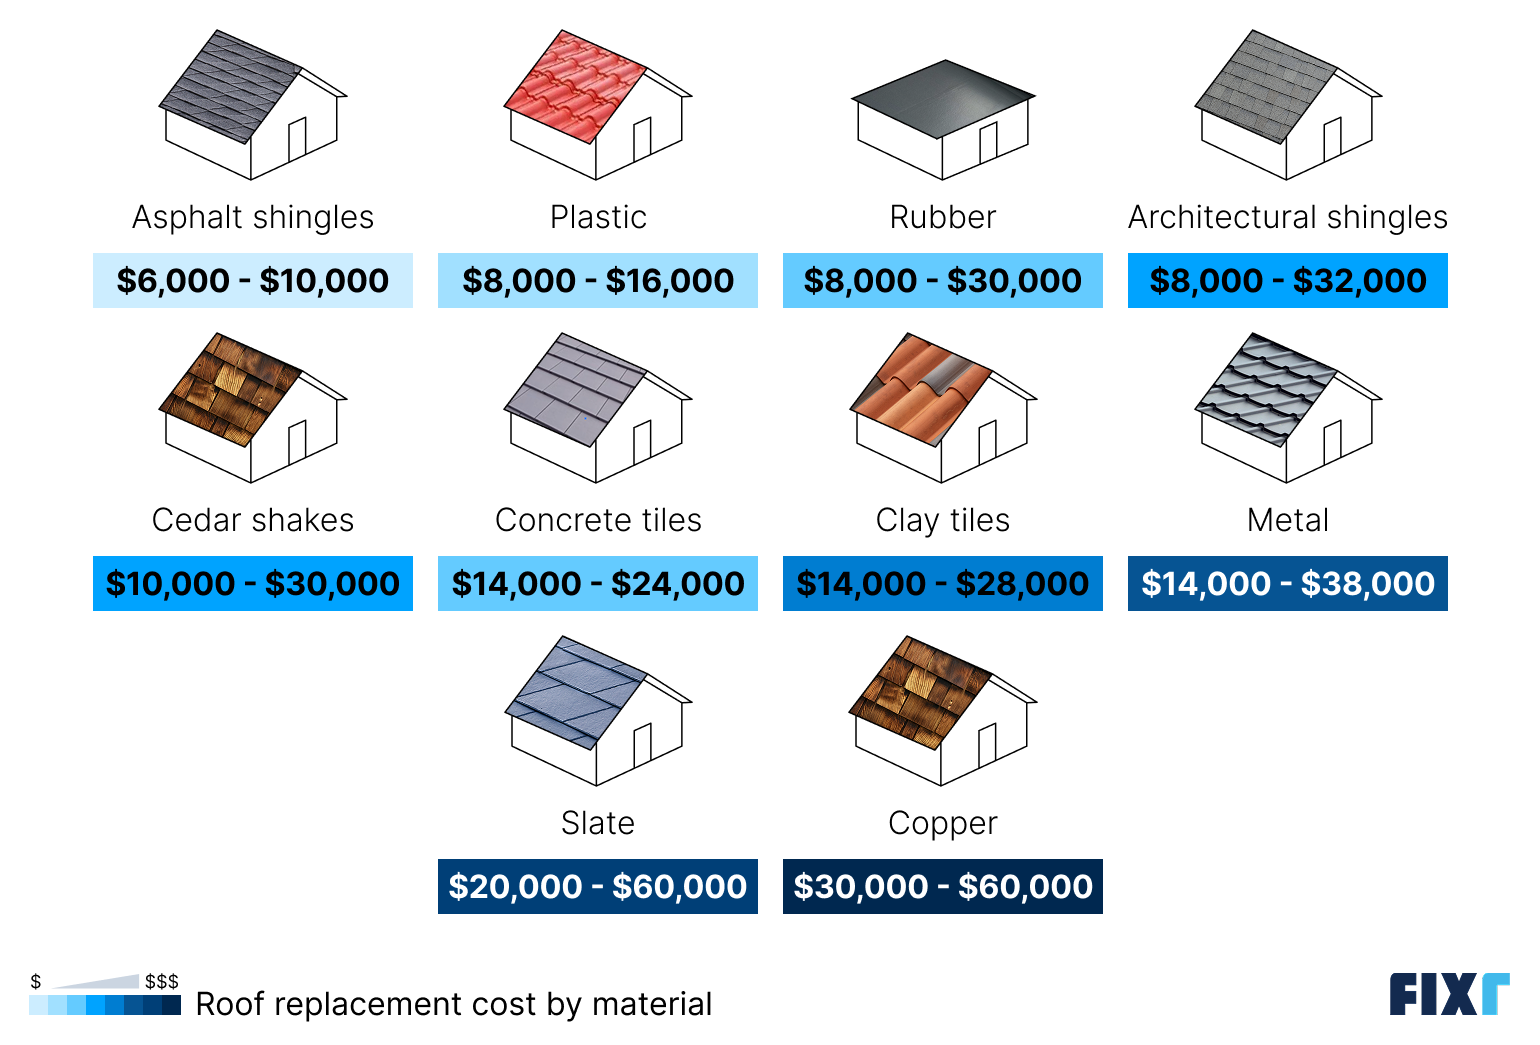
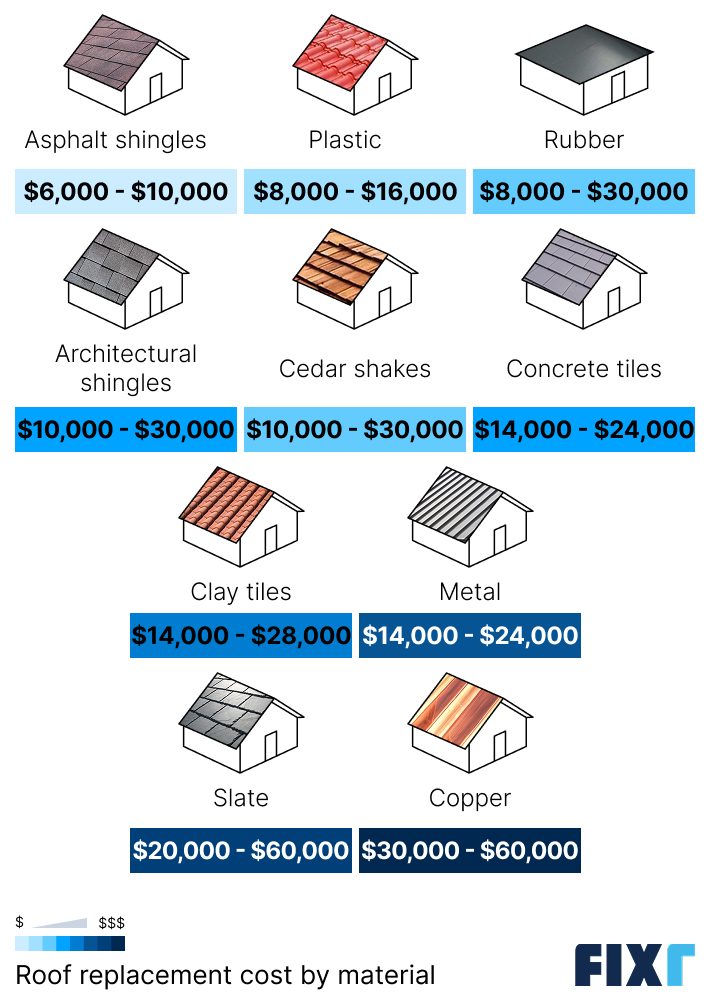
Material | Cost |
$6,000 – $10,000 | |
Plastic | $8,000 – $16,000 |
Rubber | $8,000 – $30,000 |
Architectural shingles | $8,000 – $32,000 |
$10,000 – $30,000 | |
Concrete tile | $14,000 – $24,000 |
$14,000 – $28,000 | |
$14,000 – $38,000 | |
$20,000 – $60,000 | |
$30,000 – $60,000 |
Note: Prices assume a 1,700 sq. ft. home with ~2,000 sq. ft. of roofing.
Labor Cost for Roof Replacement
Labor accounts for between 40% and 60% of your total roof replacement cost or an average of between $4,000 and $6,000. This includes the cost to remove your old roof, underlayment, and installation.
Labor costs vary based on several key factors:
How heavy and challenging it is to remove your old roof.
The complexity of installing your new roofing material.
How complex your roof is.
The hourly rate for roofers in your area.
Cost for Roof Replacement by Location
Roof replacement costs vary based on location for a few reasons. Certain roofing materials are more common in specific regions because they perform better in local weather conditions. For example, clay tile roofs are popular in hot climates, while metal roofs are common in snowy regions.
Additionally, coastal and urban areas typically pay more than rural regions.
Live in a hot climate and want to make sure your new roof can stand up to the heat? Check out our article on the best roof materials for hot climates.
Additional Cost Factors
There are many other factors that can influence your roof replacement costs, so be sure to consider all of the following if you want the most accurate estimate possible.
Roof Pitch and Shape
Steeper roofs increase total roofing square footage, even when interior space stays the same. They also require added safety measures, such as harnesses or scaffolding, which slow installation and raise labor costs. Complex roof designs with hips, valleys, ridges, or dormers further increase labor time due to additional flashing and seam work.
Roof Removal and Disposal Costs
Tearing off and disposing of an old roof averages $50 per square, including dumping fees. Costs can reach $150 per square when removing heavier materials like concrete tile or multiple layers of asphalt shingles. Local disposal and recycling fees also influence pricing.
Underlayment and Weatherproofing
Standard roofing felt is typically included in base pricing, but upgrades may be required depending on the climate. Ice and water shield, often necessary in colder regions, costs about $0.50 per sq. ft., adding roughly $50 per square. In hot climates, additional roof vents or insulation may be needed, increasing costs by $100 to $2,000.
Structural Repairs
Once the old roof is removed, contractors may uncover hidden damage from long-term leaks. Replacing roof decking costs $2 to $8 per sq. ft., while fascia and soffit repairs add $500 to $2,500. Significant rafter damage can increase total costs by up to $5,000.
Permits and Code Requirements
Most cities require permits for roof replacement, typically costing $100 to $500. Some areas enforce strict building codes that mandate fire-resistant, impact-resistant, or wind-resistant roofing materials, especially in wildfire- or hurricane-prone regions, which can add thousands to the project.
Warranty
Roofing estimates usually include a manufacturer's warranty and a workmanship warranty. While warranties are not itemized costs, contractors who offer longer or more comprehensive coverage often charge higher labor rates due to higher installation standards and material quality.
If you have solar panels installed on your roof, you’ll need to pay a solar installer to remove them and then reinstall them after you replace your roof. This can cost anywhere from $500 to $2,000, depending on how long you need to store the panels and where you choose to store them.
Roof Repair vs. Replacement
Roof repairs cost an average of just $1,150, but unfortunately, repairs aren’t always the best option.
If you know your roof has 10+ years of useful life left and is suffering from localized damage, then repairing it might be a good idea. Replacement is better for widespread wear, moss, or missing shingles.
DIY Roof Work vs. Hiring a Pro
Working on a roof yourself is dangerous, and it’s easy to mess up the old roof removal and the new roof installation. Even if you’re comfortable with DIY, you won’t be able to assess hidden damages as well as a professional would, and most importantly, roofing manufacturers will almost always void your roof’s warranty if you don’t have the materials installed by a pro.
Overall, the peace of mind you get from hiring a pro is well worth the cost of the labor.
How to Choose a Roofing Contractor
Choosing the right roofing contractor can mean the difference between a roof that lasts you decades without issues and one that looks unprofessional and leads to leaks and other problems within just a few years. Here are a few tips for finding a reputable contractor that gets the job done correctly the first time around.
Confirm your roofer is licensed and insured.
Ask your roofer for references: Ask each roofer you interview for a list of references.
Get multiple quotes: Get at least three estimates to compare pricing and scope. This helps you avoid low-ball bids that may cut corners or high bids that overcharge.
Ask about a warranty: Confirm both manufacturer and workmanship warranties before signing. Contractors who offer limited or no warranty are often not worth the risk.
Ways to Save on Roof Replacement
Roof replacement costs can add up quickly, but there are several ways to reduce expenses without sacrificing quality.
Choose a roof overlay, if possible: If local codes allow, installing a new layer over existing shingles can save labor and disposal costs.
Consider financing options: There are many ways to finance a re-roofing project, including renovation loans, home equity lines of credit, credit cards, and cash-out refinances.
Take advantage of rebates and tax credits: Some energy-efficient roofing materials qualify for incentives, especially in extreme climates.
Lean on homeowner’s insurance: If the roof was damaged by storm, hail, or wind, homeowner’s insurance may cover part or all of the replacement.
Schedule during the off-season: Roofing demand drops in fall and winter, which can lead to lower labor costs and faster scheduling.
FAQs
Oversized homes and high-end materials like metal, clay, concrete, or slate could easily bring the total up to $30,000 or more. However, the average roof replacement cost is around $10,000.
The average lifespan of a new roof varies based on the materials, but a standard asphalt shingle roof should last for 20 to 30 years. Metal roofs can last for 50 to 70 years, clay and concrete roofs last up to 100 years, and slate can last up to 150 years.
Yes, you can finance a roof replacement, and there are many options available to you. Credit cards and home equity lines of credit provide variable financing amounts that are ideal if you don’t know what your roof replacement will cost. If you have a firm estimate, a renovation loan or home equity loan could help cover the upfront costs and let you pay over time.
Roof replacement is very noisy, and it will disrupt you and your family for between one and seven days, depending on the type of material you’re installing and the size and complexity of your roof.
The cost of roof replacement per square foot averages $4.75, but you could pay anywhere from $3.75 to $11 per square foot on average, depending on the material you choose.
Installing a new roof will improve your home’s curb appeal, and it comes with an average return on investment of between 60% and 70%, which means adding between $6,000 and $7,000 to your home value, based on the average roof replacement cost.